Lesson Progress
0% Complete
코드 수정
이 활동에서는 Tobi가 ML 모델을 기반으로 사람에게 마스크를 착용하도록 지시하는 코드를 추가합니다.
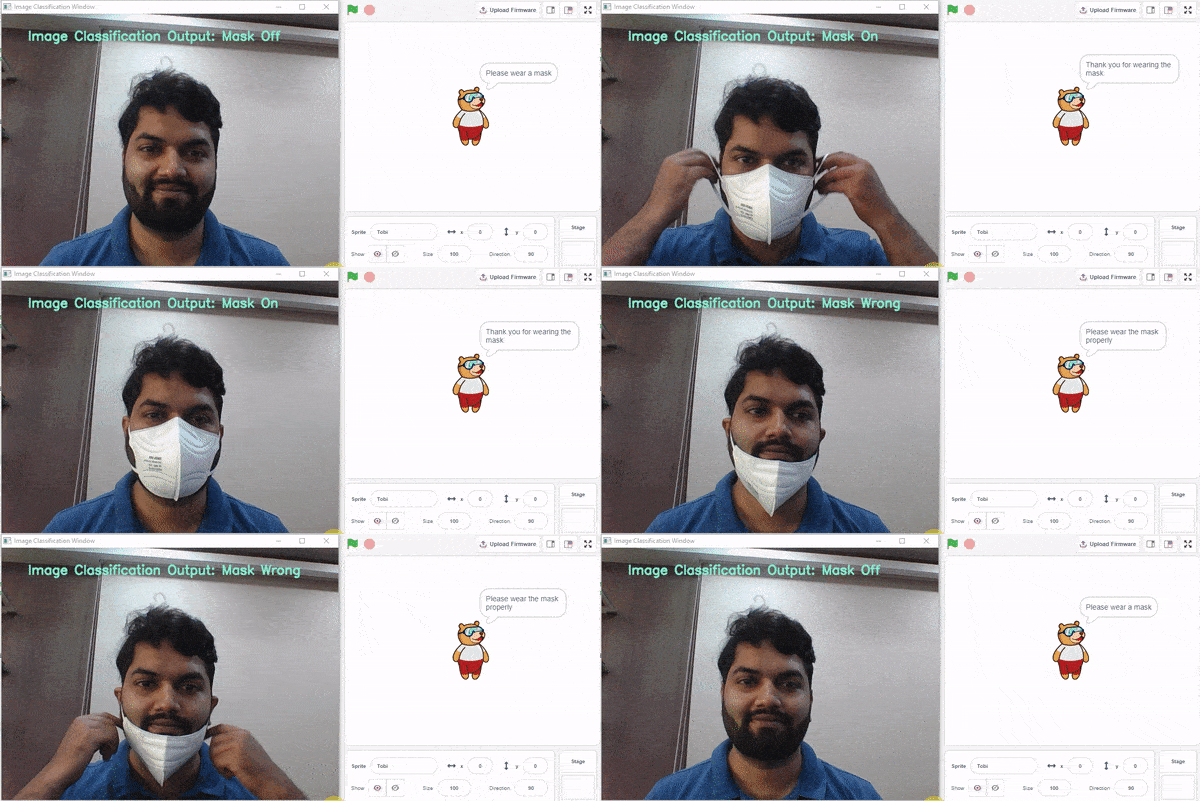
다음 단계를 따르십시오.
- 마스크 감지를 위해 훈련된 모델을 내보낸 PictoBlox 파일을 여십시오.
- 해당 코드 내에서 코드를 추가하라는 요청을 받는 섹션이 표시됩니다. 아래와 같이 표시됩니다.
############################################### #Add your code here #Add your code here ############################################### - 이 공간 내에서 프로그램 시작 부분에 스프라이트 클래스 선언을 추가합니다.
sprite = Sprite("Tobi") - 예측 중인 클래스의 결과는 predicted_class 변수에 저장됩니다.
- if-elif-else 조건문을 사용하여 predicted_class 변수에 어떤 클래스가 저장되었는지 확인합니다: Mask On, Mask Off 및 Mask Wrong. 등호 연산자( == )를 사용하여 이를 확인합니다.
- 또한 감지된 클래스(predicted_class의 값)를 기반으로 스프라이트가 다음 문장을 말하도록 할 것입니다. Sprite 클래스의 say() 함수를 사용하여 이 작업을 수행합니다.
- Mask On – 마스크를 착용해주셔서 감사합니다
- Mask Off – 마스크를 착용해주세요
- Mask Wrong – 마스크를 제대로 착용해주세요
if predicted_class == "Mask On":
  sprite.say("Thank you for wearing the mask")
elif predicted_class == "Mask Off":
  sprite.say("Please wear a mask")
else:
  sprite.say("Please wear the mask properly")
- 최종 코드가 준비되었습니다. 아래와 같이 표시되어야 합니다.
####################imports####################
#do not change

import cv2
import numpy as np
import tensorflow as tf
sprite = Sprite("Tobi")

#do not change
####################imports####################

#Following are the model and video capture configurations
#do not change

model = tf.keras.models.load_model('saved_model.h5',
                                   custom_objects=None,
                                   compile=True,
                                   options=None)

cap = cv2.VideoCapture(0)  # Using device's camera to capture video
text_color = (206, 235, 135)
org = (50, 50)
font = cv2.FONT_HERSHEY_SIMPLEX
fontScale = 0.8
thickness = 2

class_list = ['Mask Off', 'Mask On', 'Mask Wrong']  # List of all the classes

#do not change
###############################################

#This is the while loop block, computations happen here

while True:
  ret, image_np = cap.read()  # Reading the captured images
  image_np = cv2.flip(image_np, 1)
  image_resized = cv2.resize(image_np, (224, 224))
  img_array = tf.expand_dims(image_resized,
                             0)  # Expanding the image array dimensions
  predict = model.predict(img_array)  # Making an initial model prediction
  predict_index = np.argmax(predict[0],
                            axis=0)  # Generating index out of the prediction
  predicted_class = class_list[
      predict_index]  # Tallying the index with class list

  image_np = cv2.putText(
      image_np, "Image Classification Output: " + str(predicted_class), org,
      font, fontScale, text_color, thickness, cv2.LINE_AA)

  cv2.imshow("Image Classification Window",
             image_np)  # Displaying the classification window

  ###############################################
  #Add your code here

  if predicted_class == "Mask On":
    sprite.say("Thank you for wearing the mask")
  elif predicted_class == "Mask Off":
    sprite.say("Please wear a mask")
  else:
    sprite.say("Please wear the mask properly")

  #Add your code here
  ###############################################

  if cv2.waitKey(25) & 0xFF == ord(
      'q'):  # Press 'q' to close the classification window
    break

cap.release()  # Stops taking video input
cv2.destroyAllWindows()  #Closes input window
Run 버튼을 눌러 코드를 테스트합니다.
참고: 코드에 오류가 표시되면 코드를 편집하여 비디오 카메라를 변경해 보십시오.
cap = cv2.VideoCapture(0)
VideoCapture 함수에서 값 1, 2 또는 3을 매개변수로 추가해 보십시오.
폴더에서 이미지를 테스트하는 코드
때로는 이미지 파일을 분석하고 싶을 수 있으며 그에 따라 코드를 편집해야 합니다. 이 예에서는 다음 3개 파일을 분석합니다.
다음 단계를 따르십시오.
- 위의 파일을 다운로드합니다.
- 이미지 업로드 옵션을 사용하여 PictoBlox의 모든 파일을 로드합니다.
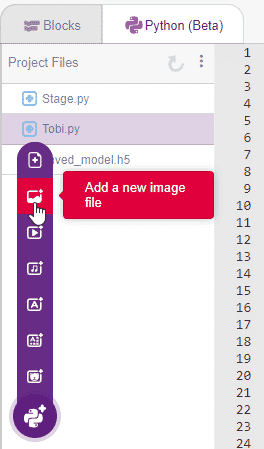 가져온 후 프로젝트 파일 에 다음 파일 구조가 표시됩니다.
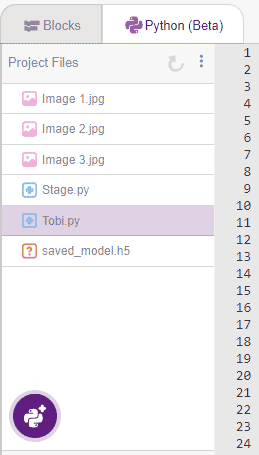
- OpenCV의 imread() 함수를 이용하여 이미지를 1 by 1 읽어오도록 코드를 수정합니다. 분석을 실행하고 imwrite() 함수를 사용하여 저장합니다. 이 두 함수에 대한 코드는 아래에 강조 표시되어 있습니다.
다음은 코드입니다.
####################imports####################
#do not change

import cv2
import numpy as np
import tensorflow as tf

#do not change
####################imports####################

#Following are the model and video capture configurations
#do not change

model = tf.keras.models.load_model('saved_model.h5',
                                   custom_objects=None,
                                   compile=True,
                                   options=None)

text_color = (0, 0, 255)
org = (50, 50)
font = cv2.FONT_HERSHEY_SIMPLEX
fontScale = 0.6
thickness = 1

class_list = ['Mask Off', 'Mask On', 'Mask Wrong']  # List of all the classes

#do not change
###############################################

for i in range(3):
  <strong>image_np = cv2.imread("Image " + str(i + 1) + ".jpg", cv2.IMREAD_COLOR)</strong>
  image_resized = cv2.resize(image_np, (224, 224))
  img_array = tf.expand_dims(image_resized,
                             0)  # Expanding the image array dimensions
  predict = model.predict(img_array)  # Making an initial model prediction
  predict_index = np.argmax(predict[0],
                            axis=0)  # Generating index out of the prediction
  predicted_class = class_list[
      predict_index]  # Tallying the index with class list

  image_np = cv2.putText(
      image_np, "Image Classification Output: " + str(predicted_class), org,
      font, fontScale, text_color, thickness, cv2.LINE_AA)

 <strong> cv2.imwrite("Image " + str(i + 1) + " Analysed.jpg", image_np)
</strong>
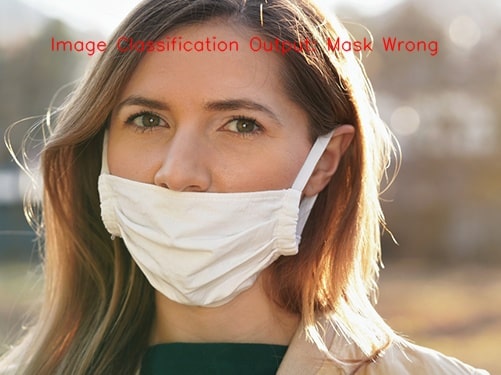
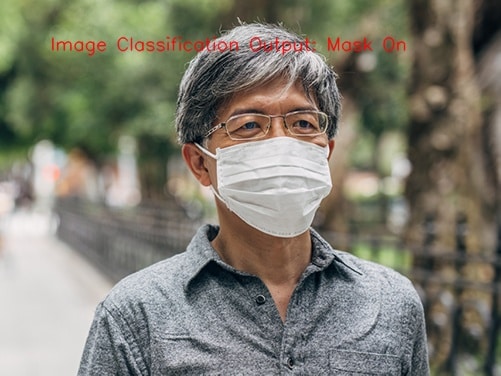
코드를 실행하면 3개의 새 이미지가 생성된 것을 확인할 수 있습니다.
- 이미지 1 분석됨
- 이미지 2 분석됨
- 이미지 3 분석됨
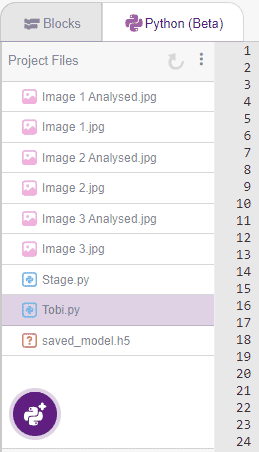
모델이 다양한 데이터에 대해 잘 훈련되어 이러한 외부 데이터에 대해 정확할 만큼 충분히 일반화될 수 있는 경우 다음과 같은 결과를 얻을 수 있습니다.
- 이미지 1 분석됨
- 이미지 2 분석됨
- 이미지 3 분석됨
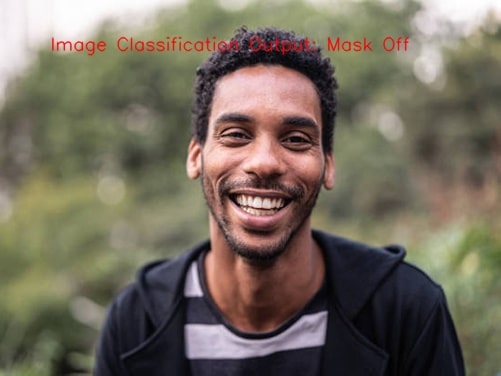
환경의 이미지에 잘못된 레이블이 표시되면 모델이 일반 데이터에 대해 정확하지 않으며 다양한 데이터에 대해 모델을 교육해야 함을 의미합니다. 이를 위해 학습 데이터에 대한 이미지를 캡처할 때 다음 사항에 주의해야 합니다.
- 화면에서 위치를 변경했는지 확인하십시오(왼쪽 오른쪽, 위, 아래).
- 화면과의 거리 변경(근거리 및 원거리)
- 배경/주변을 변경했는지 확인하십시오.
- 다른 사람에 대한 데이터 훈련(모델이 다른 얼굴에 대해 훈련되도록)
- 모델이 한 가지 유형의 조명에만 국한되지 않도록 다양한 각도에서 다양한 조명(어두운 조명, 밝은 조명, 태양광, 튜브 조명)을 사용해 보십시오.
이 모든 점을 주의하고 다양한 데이터에 대해 모델을 훈련하여 총 많은 양의 이미지(각 클래스에 대해 200-400개 이미지)가 되면 모델이 더욱 강력해지고 더 나은 성능을 제공할 수 있습니다. 다양한 유형의 데이터에 대한 정확성.
이 튜토리얼이 도움이 되었기를 바랍니다.
